Thai Coconut Pancakes (Kanom Krok)
Published Feb 19, 2021•Updated Feb 21, 2024
This post may contain affiliate links. Please read our disclosure policy.
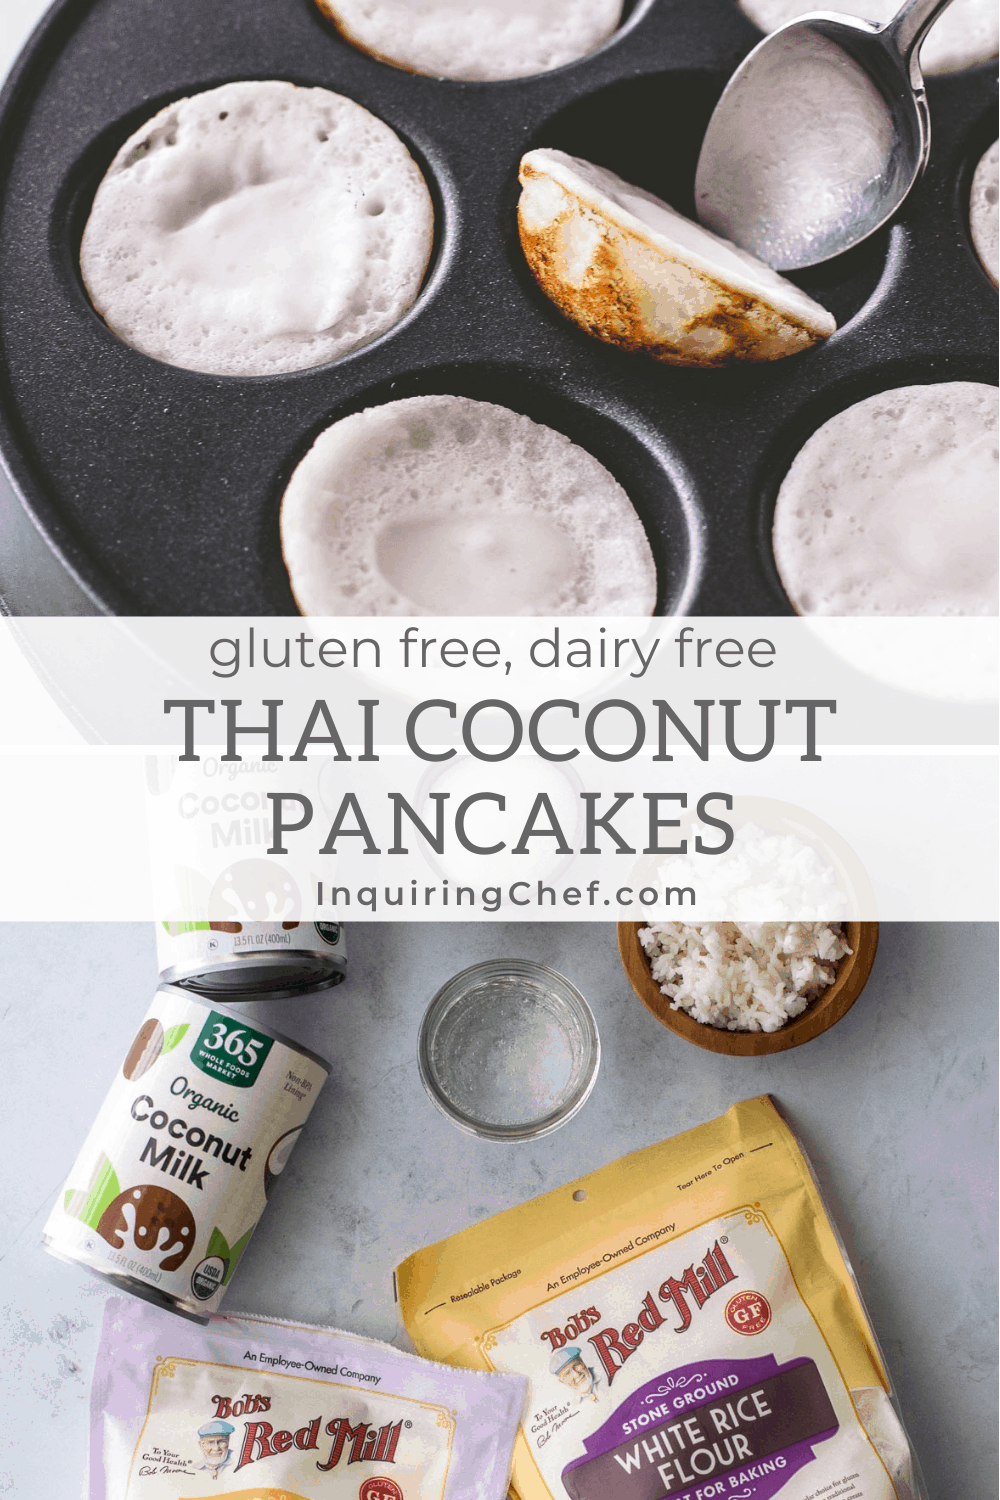
Crispy on the bottom, creamy in the middle, and slightly sweet throughout, Thai Coconut Pancakes (kanom krok) are a favorite street food snack in Thailand. These bite-sized treats are easy to prepare at home – you just need an Ebelskiver pan to get started. These are naturally gluten-free and dairy-free.
Perhaps my proudest accomplishment of this Thai Food Month was recreating one of my Thai street food snacks – Kanom Krok. It was more complicated than I originally planned and involved reviewing Thai-language YouTube videos (using what scant Thai is still floating around in my brain in the 5 years since we lived in Thailand) and English-language videos with no measurements like this one from one of my favorite Thai chefs, Ian Kittichai. I was rewarded with something that comes incredibly close to the happy memories I have of eating these, usually piping hot while walking down the street behind my office in downtown Bangkok.
What is Kanom Krok like in Thailand?
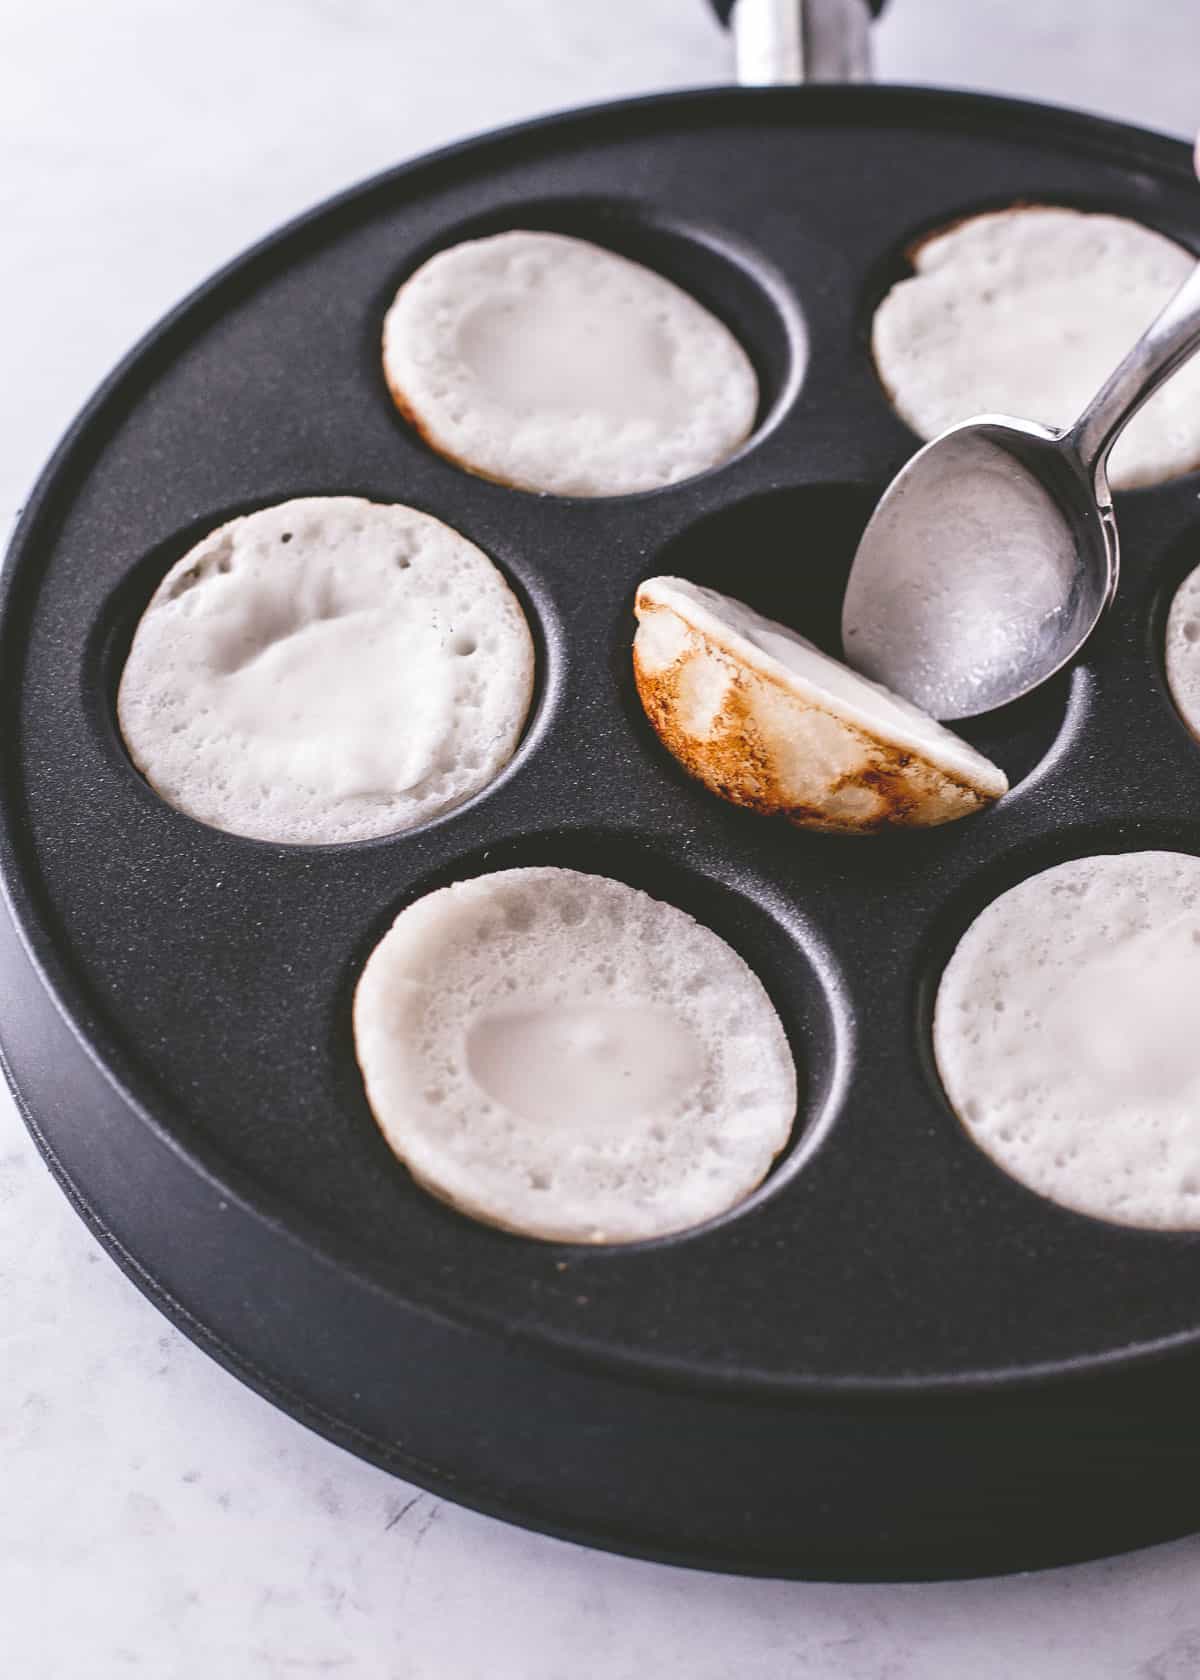
The problem I found with many other recipes in my collection of Thai cookbooks and online is that they didn’t produce the same combination of textures that I remember from eating Kanom Krok in Bangkok. Kanom Krok should have two distinct textures – crisp shell on the bottom filled with warm, soft coconut cream. The balance of those textures is what makes the bite-sized snacks so special. Crunch and creaminess in a warm hot-off-the-griddle coconut-flavored package.
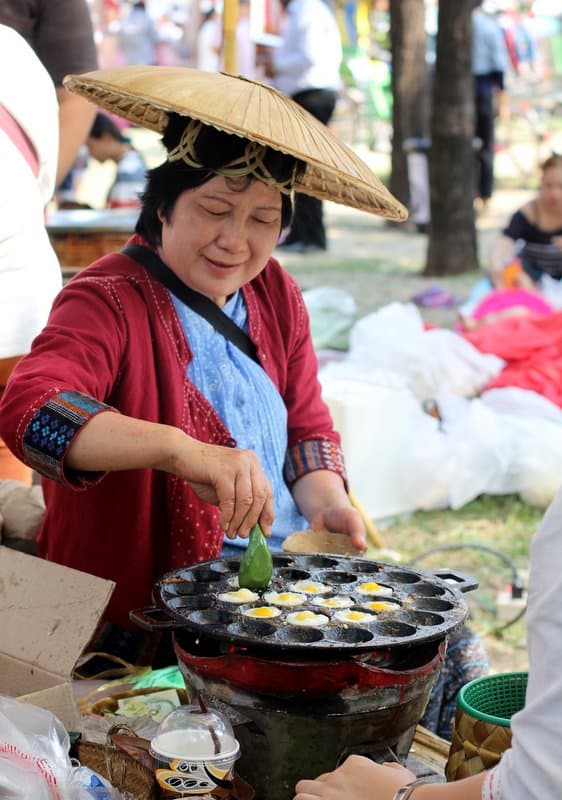
In Thailand this is a popular street snack, often sold from simple food carts. It is usually made in a special pan designed just for this dish and usually much larger than the one I use here. For the record, in the five years I lived in Bangkok, I ate hundreds of these. Below is one of the few photos I have of the snack being made. I was thrilled to make this version at home which comes very close to my memory.
And now that I’ve cracked the code, we’ve been making these treats more often than I’d like to admit. Snack for the kids, post-lunch treat, just because I have a craving. Any time is the right time for Kanom Krok.
Here’s everything you need to know about this delicious Thai snack.
Ingredients
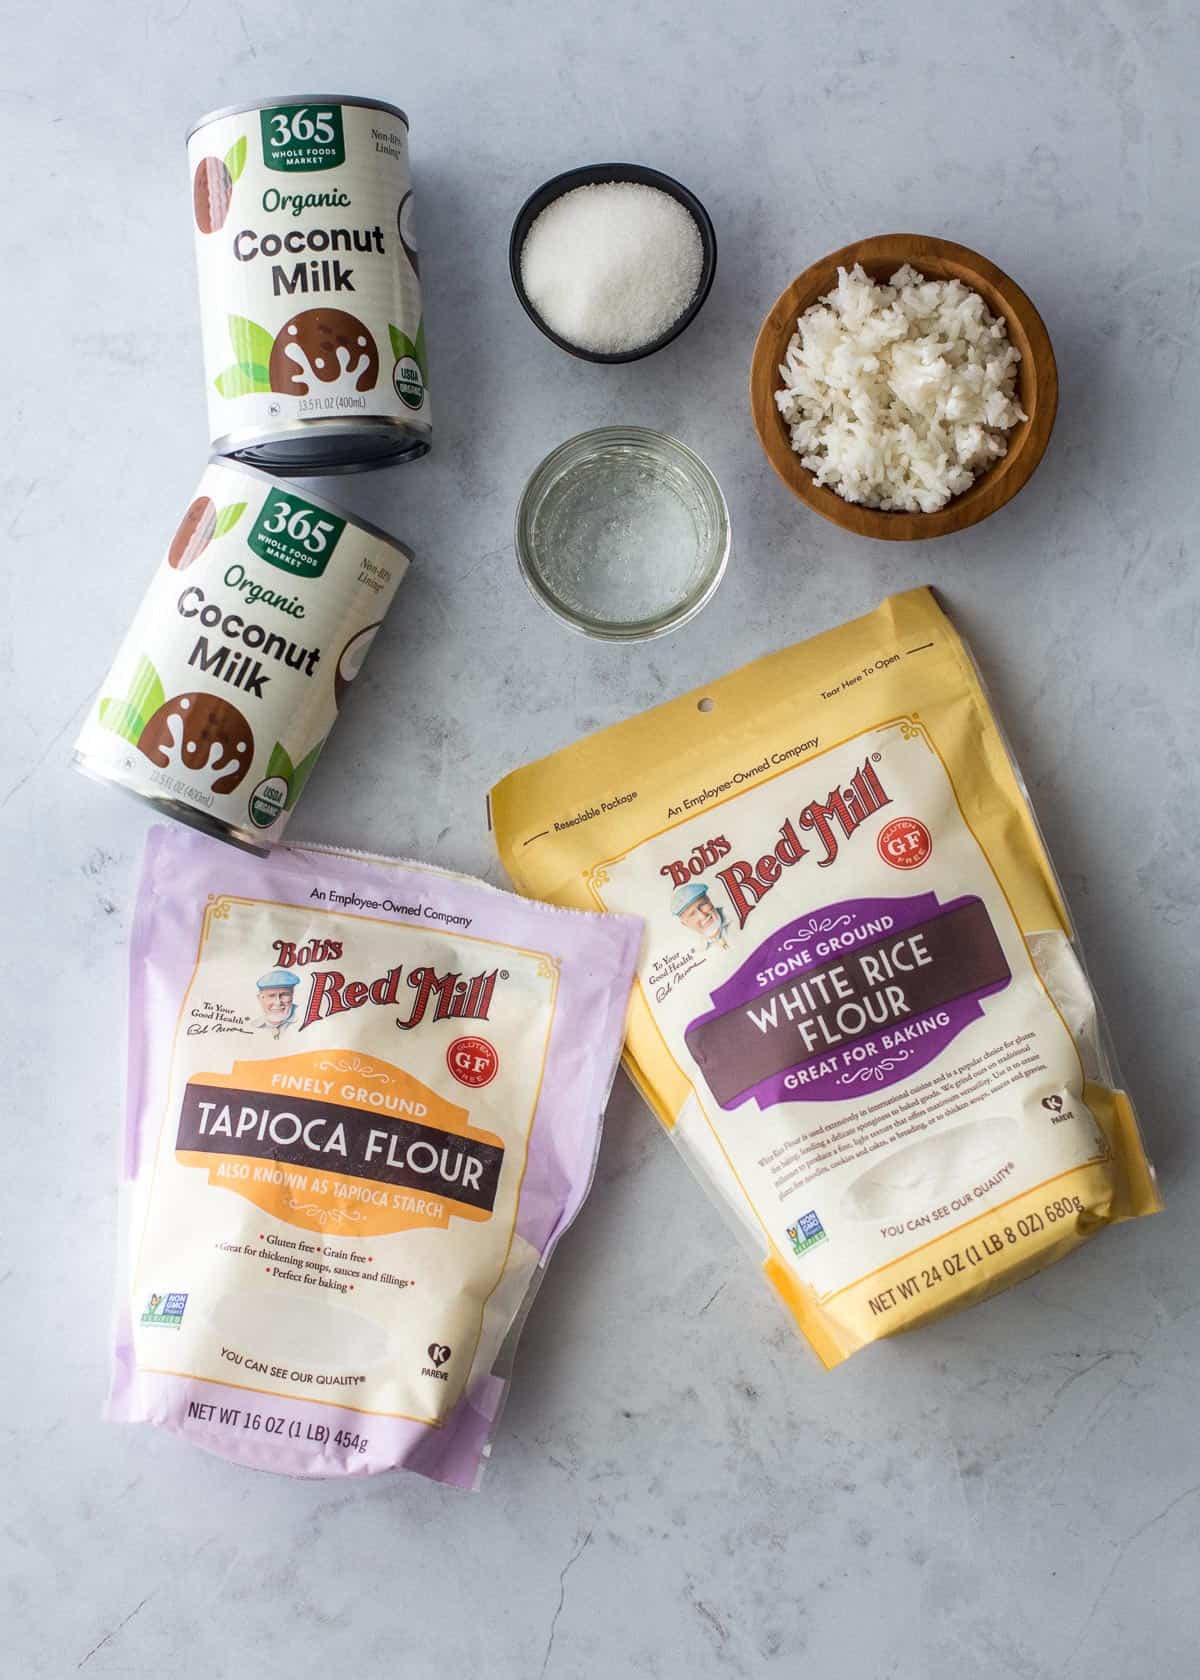
- Coconut Milk – You’ll need two 15-oz cans of regular (not light) coconut milk. One will go into the filling and one will go into the shell. Make sure to use canned coconut milk that is found in the canned or international aisle (not coconut milk that is sold as a dairy substitute in the refrigerator aisle).
- Rice Flour – Finely ground rice (rice flour) is used to thicken and give texture to both the filling and the shell.
- Cooked Jasmine Rice – Adds flavor and texture to the shell. This is a great use for leftover rice!
- Sparkling Mineral Water – A trick I’ve learned for helping all types of pancakes to get a golden brown crust as they cook is to add sparkling mineral water, and it works very well here. Both the bubbles and the natural minerals create a reaction against the hot pan and give these pancakes a crisp golden crust. Don’t skip this. You’ll only need a little, so look to buy a small single can if it’s not something you normally keep on-hand. In a pinch, any type of sparkling water will do – you can even used flavored sparkling water which will, of course, add a little bit of flavor.
- Tapioca Flour – Also called “tapioca starch”, this thickens the custard filling.
- White Sugar – Just standard white sugar adds a bit of sweetness.
- Kosher Salt – Use kosher salt or any other type of salt – just a pinch – to balance the sweetness in the shell.
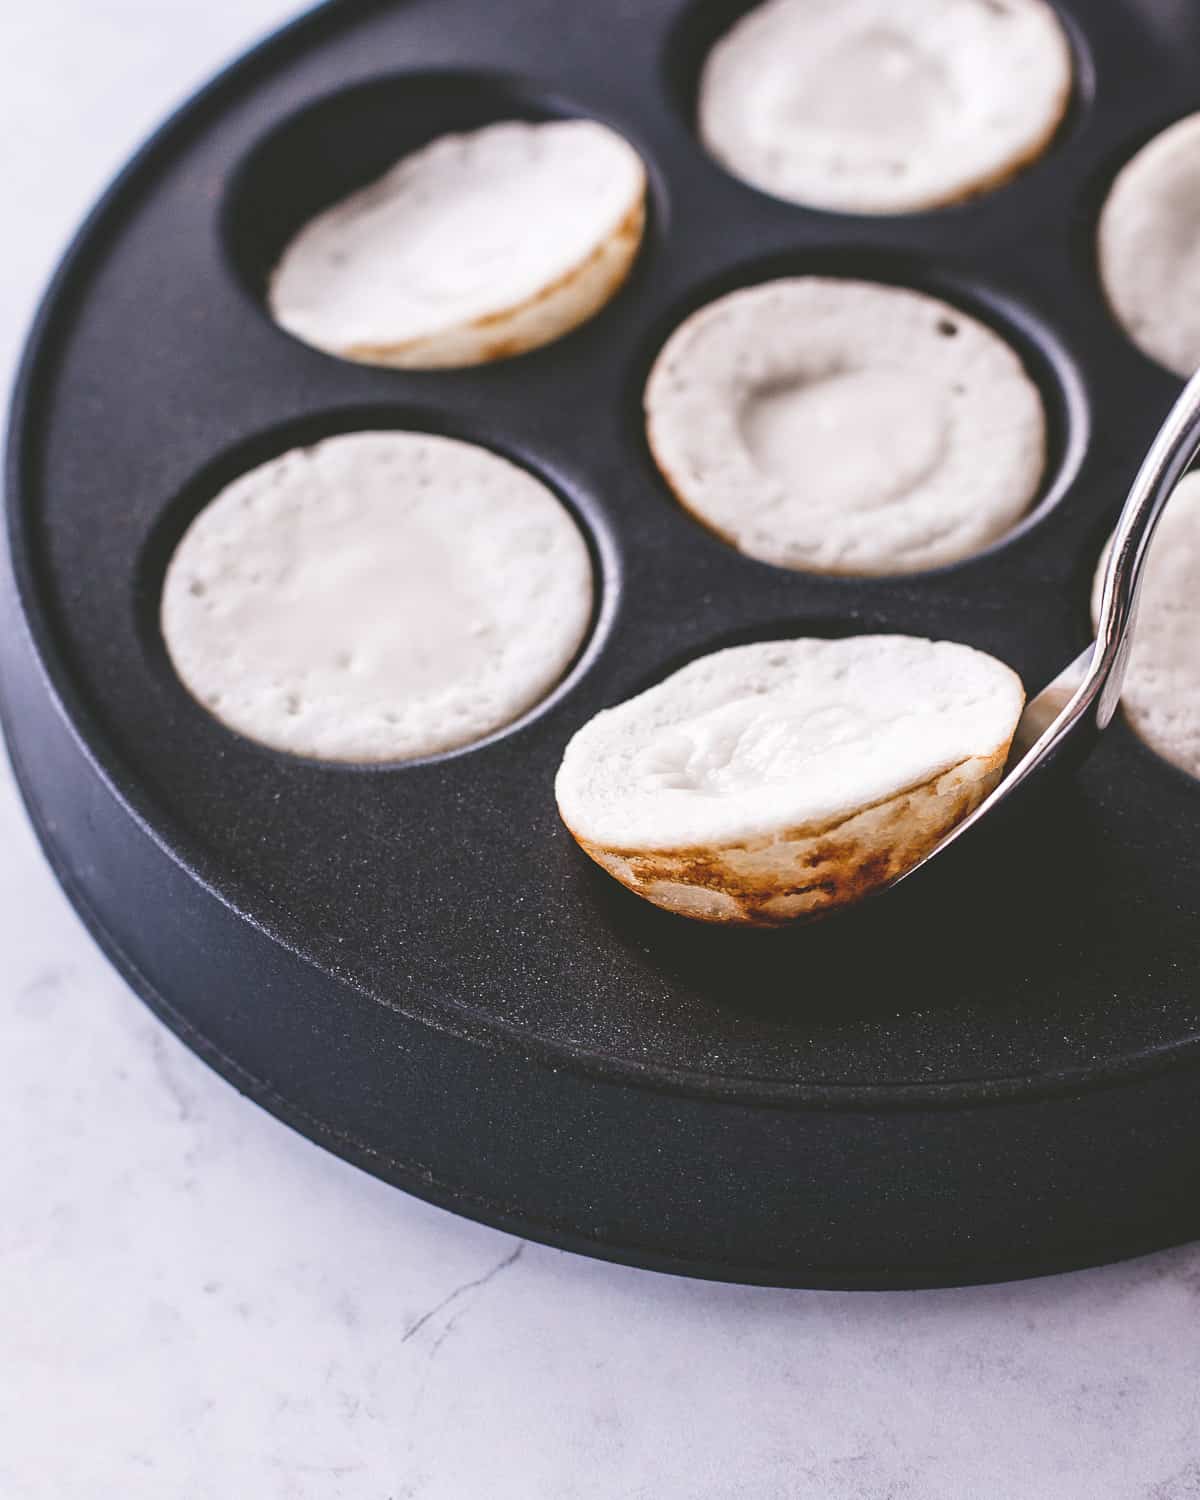
What Pan to Use for Kanom Krok
The only challenging thing about Kanom Krok is finding the right pan. I tested this recipe with two types of pans that I purchased on Amazon (links below), but ultimately I preferred the Ebelskiver pan. The spaces in the Ebelskiver pan are slightly larger than the pan traditionally used to make Kanom Krok while the Takoyaki pan spaces are slightly smaller. Therefore, I found it much more challenging to fill the Takoyaki pan and to remove the pancakes once they were done cooking.
It’s also worth noting that the Takoyaki pan needs to be seasoned like other cast iron pans in order to prevent sticking. The Ebelskiver pan below is from Nordicware and is non-stick – it was ready to use straight out of the box.
Ebelskiver pan – used to make Danish pancakes.
Takoyaki Pan – used in Japanese cooking to make savory pancakes (usually with octopus).
In the photo below, the Takoyaki pan is on the top and the Ebelskiver pan is on the bottom.

How to Make Kanom Krok
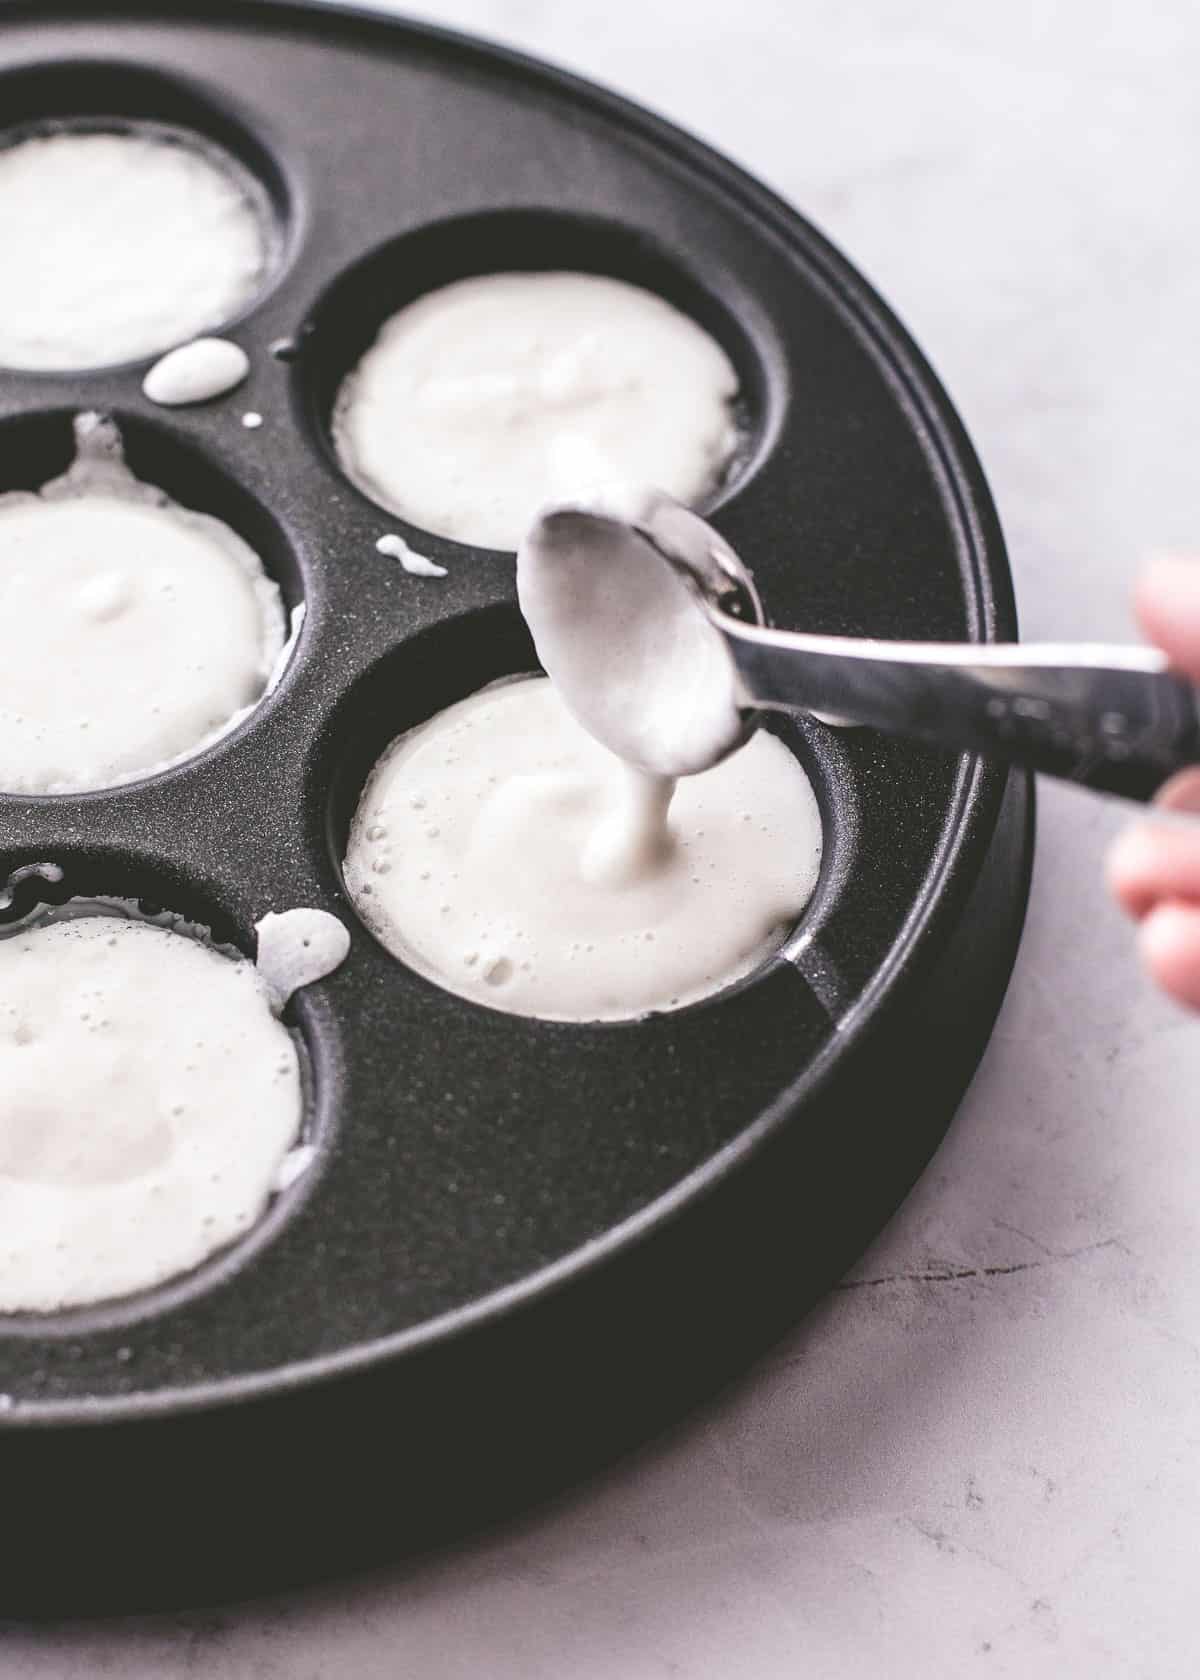
- Make the inner layer / custard: Combine coconut milk, white sugar, rice flour, and tapioca flour in a saucepan over medium heat. Simmer, whisking often, until the mixture looks thick and custard-like. Set aside.
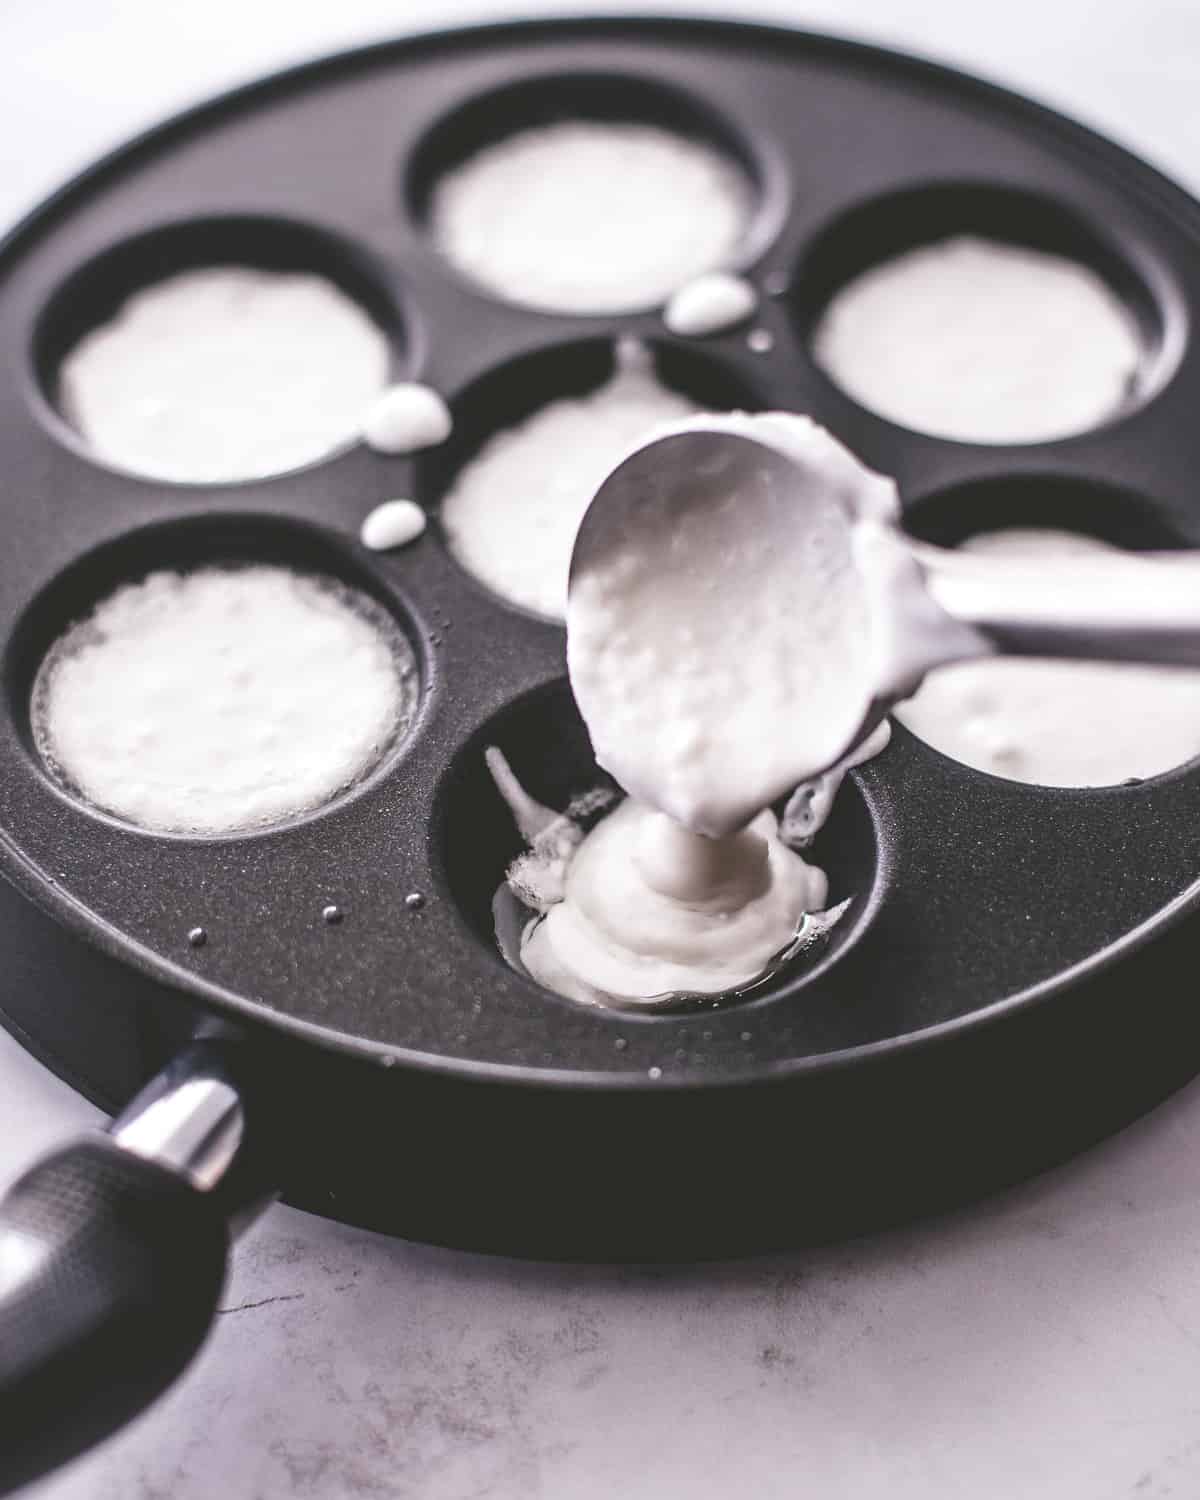
- Make the outer layer / shell: Combine coconut milk, cooked rice, rice flour, sugar, and salt in a blender and blend until nearly smooth. Add mineral water and pulse until fully incorporated. The mixture should resemble the thickness of pancake batter.
- Cook: Heat the pan over medium and add coconut oil to each space. When the oil melts, add shell batter (about 1 Tablespoon) to each space. Then, add a smaller amount (about 1 teaspoon) of custard batter to the center of each shell. Cook until the bottom is golden brown and crisp, 5 to 7 minutes.
- If adding toppings, drop them in about 2 minutes before the coconut pancakes are done cooking.
- Let cool slightly (these are super hot right when they come off the pan). Serve warm!
Toppings for Kanom Krok
Truthfully, I prefer these pancakes without any toppings at all. It’s how I ordered them in Bangkok and how I make them now at home, but it is more common to find them in Thailand with savory toppings that balance the natural sweetness of the coconut.
Common toppings are added in the last minute or two of cooking:
- Cooked Corn Kernels
- Chopped Green Onions
- Cooked Taro
- Shredded Coconut
If you’re making them at home, they’re also great with spoonful of jam on top.
More Thai Street Food Copycat Recipes
Favorite Tools

Pin this now to save it for later
Pin It Now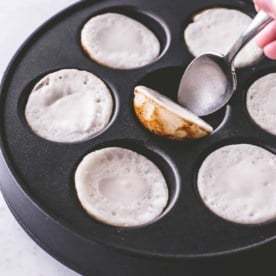
Thai Coconut Pancake Recipe (Kanom Krok)
Equipment
- Saucepan
- Blender
- Ebelskiver or Takoyaki pan
Ingredients
Inner Layer (Custard):
- 1 15 ounce can Coconut Milk (see note)
- 2 Tablespoons White Sugar
- 1 Tablespoons Rice Flour
- 2 teaspoons Tapioca Flour
Outer Layer (Shell):
- 1 15 ounce can Coconut Milk (see note)
- 1/2 cup Cooked Jasmine Rice (at room temperature)
- 1 1/4 cups Rice Flour
- 3 Tablespoons White Sugar
- 1/4 teaspoon Kosher Salt
- 1/2 cup Sparkling Mineral Water
For Cooking:
- 2 Tablespoons Coconut Oil sub any neutral-flavored cooking oil like vegetable or grapeseed)
- Chopped green onions, corn kernels, or shredded coconut, for topping (optional)
Instructions
- Prepare inner layer / custard: Combine all inner layer / custard ingredients in a small saucepan over medium heat. Whisk well to combine. Bring to a simmer. Simmer, whisking frequently, until the mixture visibly thickens, 2 to 4 minutes. Set aside.
- Prepare outer layer / shell: Combine coconut milk, rice, rice flour, sugar and salt in a blender. Blend until smooth. Add mineral water and pulse blender once or twice just until incorporated. (The batter should be a smooth consistency that pours easily, similar to pancake batter. If it is too thick to easily pour, add more mineral water a bit at a time.)
- Heat an Ebelskiver or Takoyaki pan over medium heat. When the pan is hot, brush the inside of the holes with coconut oil (you can melt the oil first and do this with a brush or use a paper towel to carefully rub oil on the insides).
- Pour shell batter into each of the holes, leaving about 1/4 inch of headspace at the top. Then quickly use a 1 teaspoon measuring spoon to spoon the custard batter into the center.
- Let the pancakes cook until golden brown on the bottom and still soft in the center, 5 to 7 minutes. (Note: You may need to adjust the heat of the pan and / or the cook time as you go to be sure that the pancakes get an even, deep golden brown color on the outside.)
- If adding toppings, sprinkle them on top in the last 2 minutes of cooking.
- When the pancakes are done, use a spoon to gently remove them from the pan and transfer them to a plate or cooling rack.
- Repeat the process until all of the batter has been used.
- Allow to cool slightly (they are piping hot right after they are cooked), but serve while still warm to retain the crisp shell and soft centers.
Notes
Nutrition
Nutrition information is automatically calculated, so should only be used as an approximation.


Nonstick Takayaki pans are available on Amazon. Think of the possibilities! Any
amuse-bouche you can dream up.
Love that!
Nonstick Takayaki pans are available on Amazon. Think of the possibilities! Any
amuse-bouche you can dream up.
I haven’t made it yet. I’m excited to try. I was drawn to it for the fact. No eggs, no gluten, no milk/dairy.
They sound delicious. Thanks!
Yes! Super allergen-friendly! And they have the most incredibly flavor and texture!
Hello! Thank you so much for the recipy! But I didn’t understand what are the exact measures of the ingredients. Can you please share it with me? Thank you in advance 🙂
Hi there – just scroll all the way down to the end of the post, or click the “Jump to Recipe” button right under the title at the top of the post. All of the measurements are in the recipe card. Enjoy!
omg this is really nice article thanks for the recipe this coconut flavor is really looks good and tasty makes me hungry omg i would try is for sure
Fun read. It’s interesting what you said about the textures not being the same in other recipes. I find that when most people find a dish they like, they bring it back home and (in my case) American-ize it. I agree that it loses something in the process. I’ve enjoyed the food here in southern Asia for several years now, and it’s hard to find when I return home. Cheers!
This one was so hard to recreate the way I remember it, but I do think this got extremely close! The texture of Kanom Krok is truly unique, and I wanted to get it as close to authentic as I could. Though I usually don’t hesitate to put my own spin on recipes I love.