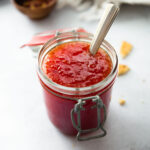
Red Pepper Jelly
Red Pepper Jelly has just three-ingredients, is sweet, can be spicy (or not), and is the perfect thing to serve over soft cheese and set out with crackers in the fall and over the holidays. It also makes a wonderful homemade gift at Christmas. This recipe makes enough jelly to fill about three 8-oz jars (or six 4-oz jars). To adjust, click on the number next to servings.
Servings: 30
Cost: $6.00
Equipment
- Knife
- Cutting Board
- Mason Jars
- Food Processor
- Heavy Bottomed Pot
Ingredients
- 1 pound Red Bell Peppers, cut into 1-inch pieces (important - weigh the bell peppers after the stems and cores have been removed; you should need about 4 regular bell peppers)
- 1 teaspoon Red Pepper Flakes (add more or less according to your spice preference; you can always taste and add more after cooking)
- 3 cups White Sugar
- 1 cup White Wine Vinegar
- 1 Tablespoon Unsalted Butter
- 3/4 teaspoon Kosher Salt (I use Morton’s)
Instructions
- In a food processor, combine red bell peppers and red pepper flakes. Pulse until very finely chopped.
- Combine bell pepper mixture, sugar, vinegar, butter, and salt in a heavy-bottomed pot. Bring to a vigorous boil over high heat. Boil mixture for 10 to 15 minutes (the longer it boils the thicker it will be - 10 minutes will give you a very loose jelly; 15 minutes will give you a more spreadable consistency). The jelly will thicken as it cools, so don’t worry if it seems loose right after boiling.
- Divide jelly between jars, leaving at least 1/3-inch of headspace at the top (this is especially important if you are planning to freeze the jelly because it will expand as it freezes).
- Let jelly come to room temperature and then add lids.
- Refrigerate or freeze jelly until ready to use. (Jelly will keep for several weeks in the fridge and up to six months in the freezer.)
Notes
This recipe was adapted from Gourmet magazine, December 2006. The original recipe uses pectin, but over the years I’ve found that I prefer the consistency and flavor of the jelly made without pectin and thickened by boiling for longer than recommended in the original.
Jars for Canning - I use Ball 4-oz Mason Jars or Ball 8-oz Mason Jars for this recipe. I also keep tons of these mason jars on-hand for making sauces, vinaigrettes and dips. My kids use the 8-oz jars as juice glasses.
Warming to serve: If you would like to serve the jelly warm (I highly recommend this if you are going to serve it over cream cheese or brie), reheat it on the stovetop or in the microwave until warm to the touch.
Hot Water Can / Preserve Red Pepper Jelly:
Note: Be sure to familiarize yourself with and use the USDA’s guidelines to insure safe preserving methods. I am not an expert in this area, but have always had great success using the USDA guidelines and my handy Ball Blue Book.
- Before making the jelly, sterilize your jars and lids. To do this, wash jars, lids, and bands in hot soapy water. Rinse and dry well. Put empty jars on a rack in a boiling-water canner and add enough hot water to cover by 2 inches. Bring to a boil, covered, then boil 10 minutes. Meanwhile, place lids in a small saucepan and cover by at least 2 inches of water. Heat until a thermometer registers 180°F / 82°C. Remove jars and lids from heat, leaving them in hot water, covered, until ready to use.
- Make jelly according to instructions above.
- Carefully remove warm jars and lids with canning tongs. Drain jars upside down on a clean kitchen towel and quickly dry lids. Invert jars and immediately ladle hot jelly into jars, leaving 1/3-inch of headspace at top. (If you have a partially-full jar, refrigerate it and use within a few weeks.) Gently tap the jars on the counter to release air bubbles. Wipe off rims with a damp, clean kitchen towel. Firmly screw on lids with screw bands.
- Put sealed jars on rack in canner and add more hot water to cover by 2 inches. Bring to a full boil, covered, and then continue boiling with the lid on for 15 minutes. Transfer jars with canning tongs to a towel-lined surface to cool. Let cool completely, 12 to 24 hours. You will know the jars have sealed if the lids are concave. (Put any jars that haven’t sealed properly in the refrigerator and use within a few weeks.)
Nutrition
Calories: 87kcal | Carbohydrates: 21g | Protein: 1g | Fat: 1g | Saturated Fat: 1g | Polyunsaturated Fat: 1g | Monounsaturated Fat: 1g | Trans Fat: 1g | Cholesterol: 1mg | Sodium: 61mg | Potassium: 37mg | Fiber: 1g | Sugar: 21g | Vitamin A: 505IU | Vitamin C: 19mg | Calcium: 2mg | Iron: 1mg