No-Knead Baguette
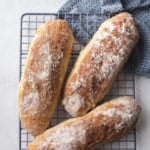
Bakery-fresh baguettes are easier than you might think. This unique recipe makes 3 baguettes in a 9x13 pan. They're not as long as traditional French baguettes, but they are golden, crisp, and don't require any kneading to make. We love to serve these with dinner or make them into incredible sandwiches.
Servings: 6
Cost: $5.00
Equipment
- Large Mixing Bowl
- 9x13 Baking Dish
- Parchment Paper
Ingredients
- 4 cups all-purpose flour, plus more for dusting (500 grams)
- 2 teaspoons kosher salt (I use Morton’s coarse kosher salt)
- 1 tablespoon sugar
- 2 1/4 teaspoons fast acting or “instant” yeast (see note)
- 2 cups warm water (473 milliliters) (see note)
Instructions
- In a large mixing bowl, whisk together flour, salt, sugar, and yeast. Pour water over dry ingredients and stir until no dry spots remain. The dough will be very sticky, but just scrape down the sides as you stir.
- Cover the dough with a clean dish towel and leave it on the kitchen counter to rise until doubled in size, 45 minutes. (If your kitchen is on the colder side, let the dough rise for 60 minutes.)
- While the dough rises, set out a 9x13 baking dish (a metal dish will give you the most crisp bread, but a glass dish will also work). Take a piece of parchment paper that is about 13x16 inches (the pre-cut sheet sheets of parchment paper are perfect for this). Starting with the short end facing you, fold the parchment into thirds. Start with the left long side and fold it in toward the right, then take the right long side and fold in toward the left, like you are folding a letter. Unfold and you should have two folds across the paper. Place the parchment in the pan and pinch each of the folds up so that they serve as dividers for the dough.
- When the dough is done rising, generously dust a clean counter with some flour. Turn the dough out onto the countertop. Dust the top of the dough and your hands with more flour. (Reminder - the dough is very sticky, but just keep dusting with as much flour as you need. That sticky dough will yield light, tender bread.)
- Use a serrated knife or dough scraper to divide the dough into three even portions. Working with one portion of the dough at a time, gently roll it into a long baguette-shaped loaf, a few inches shorter than the long side of the pan. Transfer the dough into the pan. Repeat with the remaining portions of dough, creating three side-by-side loaves. (If things get sticky, just keep dusting with some more flour. The loaves may not look picture-perfect, but they’ll taste great!)
- Preheat the oven to 450°F / 232°C. Place the pan with the dough near the oven as it heats. Let the loaves rise until rounded and nearly doubled in size again, about 30 minutes more. (Again, if your kitchen is on the cold side, give it 45 minutes to rise here.)
- Bake the bread in the heated oven until the top is deep golden brown and crisp, 30 to 32 minutes. (Use an instant read thermometer if you have one. The bread is done when it reaches 210°F in the center.)
- As soon as the bread is done baking, tip the loaves out onto a cooling rack. (Note: Don’t leave them in the pan or they will steam and lose some of the crisp crust.) Let them cool slightly, slice, and serve!
Notes
Yeast - 2 1/4 tsp of Fast Acting or “Instant Yeast is one 1/4 oz packet of yeast (often sold in 3-packet sets). Be sure to get yeast labeled as Fast Acting, Instant, Quick-Rise, Bread Machine, or RapidRise - any of these will work. Do NOT use “Active Dry Yeast” for this recipe; it needs to be dissolved in water before using.
Water - Check the label on the brand of yeast you have purchased for the recommended water temperature. Water that is too hot will kill the yeast, water that is too cool will not “activate” it. Use a thermometer to check the temperature or just make sure it feels warm (but not hot) to the touch.
Dusting with flour or cornmeal - The key to shaping the loaves of very sticky dough without them sticking to your hands or the pan is to dust everything lightly with either all-purpose flour or cornmeal. Either one will work.
Storing bread - Sliced bread can be stored at room temperature for 2 days (it’s best warmed in the toaster after the first day) or can be frozen for up to 6 months.
This recipe is adapted from what is, as far as I’ve been able to figure out, the original source - Mrs. Howard G. Shutte, Jr. as published in the Three Rivers Cookbook III of Pittsburgh, Pennsylvania (1990). Tips, tricks, and the discovery of this recipe come from my grandma - Jeanne Gregg.
Nutrition
Calories: 315kcal | Carbohydrates: 66g | Protein: 9g | Fat: 1g | Saturated Fat: 0.1g | Polyunsaturated Fat: 0.3g | Monounsaturated Fat: 0.1g | Sodium: 781mg | Potassium: 101mg | Fiber: 3g | Sugar: 2g | Vitamin C: 0.003mg | Calcium: 16mg | Iron: 4mg